6.9 KiB
Acknowledgements
I blame cqql for this existing.
Disclaimer
I largely know nothing about this topic and everything you see here is knowledge I gathered myself over the course of an afternoon.
The Idea

This is the post that threw me down this rabbit hole and started it all.
After doing a bit of searching around, for ways to maybe solve this problem I stumbled on OpenCV, which also happens to have a python port. Perfect for quickly hacking something together.
The Process
First I imported the image as grayscale and let OpenCV find the contours for me. The contours themselves are represented as the points at the edges as seen here:

Which we can trace to form the complete outline as seen here:

Actually Implementing this was as simple as
def GetContoursFromFiles():
    cnt = []
    for i in range (0, MAX, 1):
        img = cv2.imread(str(i)+'.png',0)
        ret, thresh1 = cv2.threshold(img, GrayscaleThreshhold, 255,cv2.THRESH_BINARY_INV)
        contours,hierarchy = cv2.findContours(thresh1,cv2.RETR_TREE,cv2.CHAIN_APPROX_SIMPLE)
        print("Number of Shapes detected in Image "+str(i)+":",len(contours))
        cnt.append(contours[0])
    return cnt
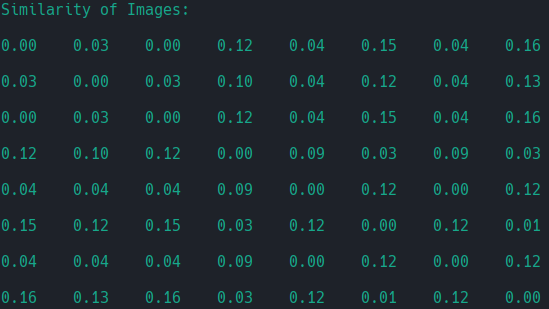
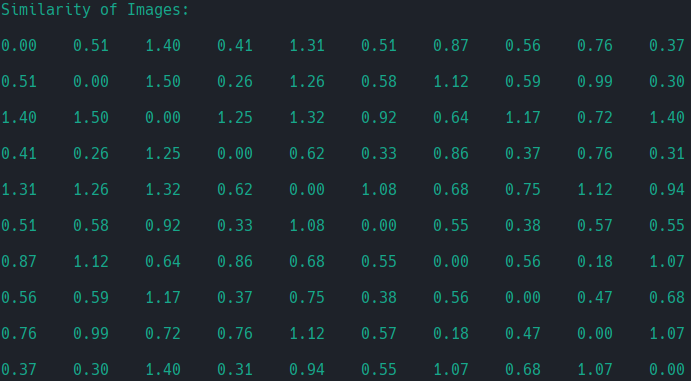
Next, I had OpenCV compare the different outlines with each other, which I used to build a NxN Matrix of weights.
(I love when libraries already do everything for me, especially all the math I wouldn't even know where to start with learning it).
Then I just had to pretty print the matrix and that could be considered Task Complete:
There's more
Now that I've already come this far, why not present the information in a format, that's easy to visually parse?
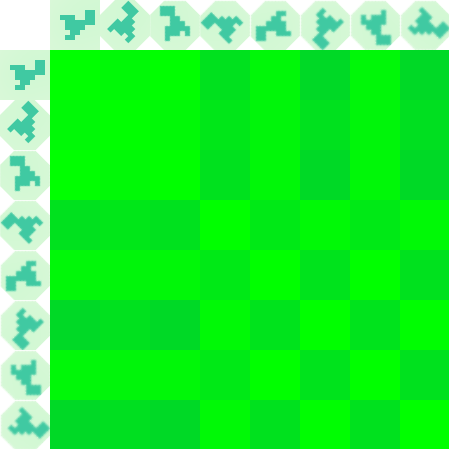
So that's exactly what I did. I stitched together all the source images to form two axis and used the weights I previously got to color in all the squares.
(This might sound simple, but this is actually the part, that I needed to write the most code for, turns out transforming weights into a nice looking color matrix isn't as easy as it sounds.)
But the result was well worth the effort:
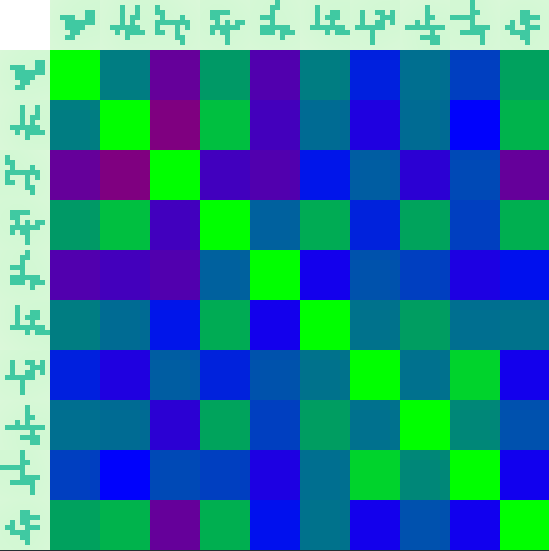
So, what actually took all the effort? This:
def CreateMatchingColorMatrix(mat):

    im_res = cv2.imread(str(0)+'.png',cv2.IMREAD_COLOR)
    height, width, channels = im_res.shape
    # (Coordinate 0/0) Color (white)
    im_temp = np.full((height, width, 3), 255, np.uint8)

    norm = matplotlib.colors.Normalize(vmin=0.0, vmax=NormUpperBound)
    # Build Topmost row (just iterate through all images and concat them sequentially)
    for i in range(0, MAX, 1):
        img = cv2.imread(str(i)+'.png',cv2.IMREAD_COLOR)
        imgg = cv2.imread(str(i)+'.png',0)
        ret, thresh1 = cv2.threshold(imgg, GrayscaleThreshhold, 255,cv2.THRESH_BINARY_INV)
        # find the contours in the binary image
        contours,hierarchy = cv2.findContours(thresh1,cv2.RETR_TREE,cv2.CHAIN_APPROX_NONE)
        img = cv2.drawContours(img,contours[0] , -1, (255, 0,0), 3)
        im_temp = cv2.hconcat([im_temp, img])
    # This top row is now our first row
    im_res = im_temp
    # Build The matrix row by row
    for i in range(0, MAX, 1):
        im_temp = cv2.imread(str(i)+'.png',cv2.IMREAD_COLOR)
        img = np.full((height, width, 3), 255, np.uint8)
        img[:] = (0, 0, 255)
        # Individual row here, current sequential image gets chosen above, so here, we can do square coloring
        for j in range(0, MAX, 1):
            cmap = matplotlib.cm.get_cmap('brg_r')
            cmap.set_over((0.0,0.0,0.0))
            # Gets current weight, normalises it, looks it up in color map, converts it to full scale, colors
            img[:] = NtoF(cmap(norm(mat[i*MAX+j]))[:-1])
            # build up row
            im_temp = cv2.hconcat([im_temp, img])
        #build up matrix
        im_res = cv2.vconcat([im_res, im_temp])
    DebugDrawImage(im_res)
That's because I'm assembling the Matrix piece by piece and since I was learning as I went, I incrementally built it in such a way, that one part completely worked before moving on to the rest.
Specifically, I first tried to build the row and column headers, by filling all the other spaces with a dummy image 0.png. Then I had to figure out how to color them white. Afterwards, I tried to color code them, at which point I pulled in matplotlib for the colormaps. But because it uses different value ranged, I needed to do a bit of back and forth conversion, which led to this fun line which does all the heavy lifting for the coloring right here:
# Gets current weight, normalises it, looks it up in color map, converts it to full scale, colors
img[:] = NtoF(cmap(norm(mat[i*MAX+j]))[:-1])
Rotation
How does it handle rotated shapes? Was the next question thrown my way. Turns out, better and worse than expected at the same time.
I expected rotation to not perform too well, as you can't perfectly rotate pixellated images. But it also turns out, OpenCV can handle them quite well and the biggest error actually comes from the way rotation is performed.
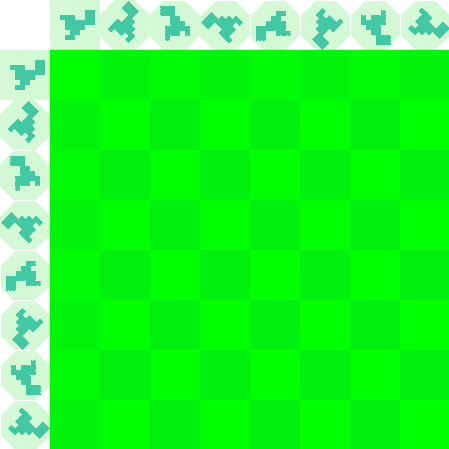
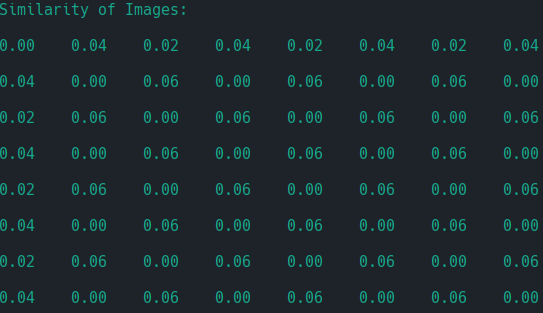
To Demonstrate, here we have 45° Rotations of the same object, performed with different Interpolation algorithms with their associated weights.
Algorithm #1:
Algorithm #2:
The second algorithm seemed to perform more consistently when using 45° rotations. Sadly, it completely failed with 22.5° rotations (which may be something I could fix, but I've already spent enough time on a "let's just do 10-15 minutes of research" project.)
Why write this post in the first place?
There's more pictures here than text, which means fedi isn't the best place to post this with the way it handles pictures. And I really wanted to share the pictures I generated.
Where to find this stuff?
Frost Pattern Generator
I used the Frost Pattern Generator written by cqql for my sample images, as they provide the perfect base for this. Yep, the same person who got me started on this. It can be found here:
https://moonlit.technology/cqql/frost_patterns
My own code for this
Now, keep in mind, this was quickly hacked together while I was learning how to even do this thing. With this disclaimer, the code can be found here:
https://moonlit.technology/NixLynx/shape_matching
(Make sure to follow the license :3)
<style>
body { min-width: 40% !important; }
</style>
